
I'm back with the next installment of the Star Wars: Legion by Fantasy Flight Games series. Last time I wrote about the game, I gave a brief overview of the core set, how the game is played, and mentioned that the pieces come unassembled and unpainted. Today I'll be giving you a tutorial on how to paint some of the figures included in the core set- specifically the Stormtroopers. This was my first time painting a mini-figure so it's not 100% perfect, but it'll give you a good idea on how to paint these figures for gameplay no matter what skills you have. I'm no professional artist so if I can do this, you can too! I'll try to make this tutorial as simple as possible, but if you have any questions along the way feel free just to leave a comment and I will answer them as best as I can.

Above are a few unfinished figures from the core set . As you can see by the trooper on the far left, their arms come unassembled and you also have to glue their feet to the base piece. They come molded in gray plastic, which you then have to paint if you want your pieces to actually look like Stormtroopers. The pieces shown above have been primed with a few small details (eyes and frown) already painted black.
Let's get started! I'll be touching upon all the supplies you'll need in each step of the process.
Disclaimer: Affiliate links are used, meaning if you purchase through my link I will receive commission at no additional cost to you. I only ever recommend products that I use and LOVE. Affiliate marketing allows me to continue to share free and affordable information and services! Thanks for your support!
Prep
This step can be skipped if you're not super particular about the finish of your figures, but if you're a detail freak, take a small file and sand down the mold lines on your figure. You will notice a few fine lines on the body of your Stormtrooper that are from the mold not lining up precisely. It's not a big deal if you don't want to fix this, but if you want to make your guy (or gal) look super smooth, just give a quick file. After this, go ahead and glue your piece onto the base, but leave off the arms. We'll glue those on later.

Prime
Before you paint all the cool details, you'll need to prime your figures. You can do this by hand with the primer spray paint or by airbrush if you have one. My Stormtrooper figures are airbrushed with the Vallejo surface primer in Gray , but the Rebel troopers are painted with the spray Army Painter primer
 . How you want to prime your figures is totally up to you. You can prime them white if you choose, but I think the light gray accentuates the details and allows you to highlight the parts you want to be true white. I'll touch on this more in a bit.
 |
| Spray Primers |
 |
| Airbrush Primers |
Base Coat
Once your figures are primed, you can start getting into the fun part- painting the base coat! For this step you'll need paint, paintbrushes (very fine bristles), a small cup of water and a paint palette. Vallejo is my preferred brand of model paint, but there are all sorts of brands from gaming and hobby stores that you can try out and test for yourself. For the Stormtroopers, you'll need bright white , black
 , light gray
 , and a deep royal blue
 . Below are some photos of the paints and brushes
 I used.


Next you'll take your light gray paint, water it down a little, and paint the indents in the helmet on the front and back. By watering the paint down, it makes the paint more runny and allows the color to sit right in the crevices of the helmet. After that you will paint the stripes on the cheeks dark blue. Make sure that you clean off your brush in the water between each color application and dry it off on a napkin. Now you can glue the arms on with a couple dots of superglue.

If you're a painting newbie and don't want to go any further with the weathering process, your figure can be considered finished at this point. The piece you see above is game-ready if you choose to leave it that way. Pretty easy, right? If you want to add more detail to your pieces, keep reading!
Highlighting
It was funny to me when my fiancé explained the highlighting/weathering part of the painting process because I very easily related it to makeup. Girls, this part of the process is basically like highlighting/contouring your face. Haha! Guys, here's what I mean in real talk- now you'll take your white paint and highlight the parts of your trooper that are raised. This includes the leg and arm strips that run across the shin and forearm. You will see these strips pretty easily...they are raised higher than the armor. You can pretty much brush white paint over any spots you want to accentuate. I painted any high spots that would technically "catch the light" if these troopers were outside. I also gave a little spot of white to the top of the helmet and toes of the boots. You can see the highlighted spots pretty clearly in the photo below.

Weathering
The next step is to accentuate the opposite of your highlighted areas. You could call this step contouring, but I think it's more appropriate to call it weathering since these areas of the armor are cracks and crevices where dirt could easily build up. Take some black paint and water it down so that it creates a wash. You could buy wash paint for this step, but if you want a budget-friendly solution, just mix in some water with a few drops of paint. Drag your brush along the low valleys and crevices of your piece. I weathered almost all of the edges of my highlighted areas.

Blending
You can see in the photo above that the weathered lines look very harsh and dark. If they look too dark for your taste, you can mix light gray and white paint to create a blending color. Use this color to blend out the harsh edges of your weathered lines. This will create a smoother, more polished final product.
Ground Texture
At this point, you're pretty much done! You can add ground texture to your base depending on what type of environment your troopers will be playing in. You can get some fake moss, sand, or little rocks to put on the base. Below is a photo of a faux-sand paste that we'll use for our troopers to fight on a sand planet. Once this paste is applied, you can paint over it as well with any color you choose.

That's it! Once you complete these steps, your pieces will be ready for gameplay or display. I'd recommend doing all of these steps in a bulk process on your pieces so it doesn't eat up too much time. For example, prime all of your figures at once and then paint all of the black details at one time. Rather than fully finishing each figure one at a time, if you do each step on all of your figures, you'll save yourself a lot of time and brush cleaning.

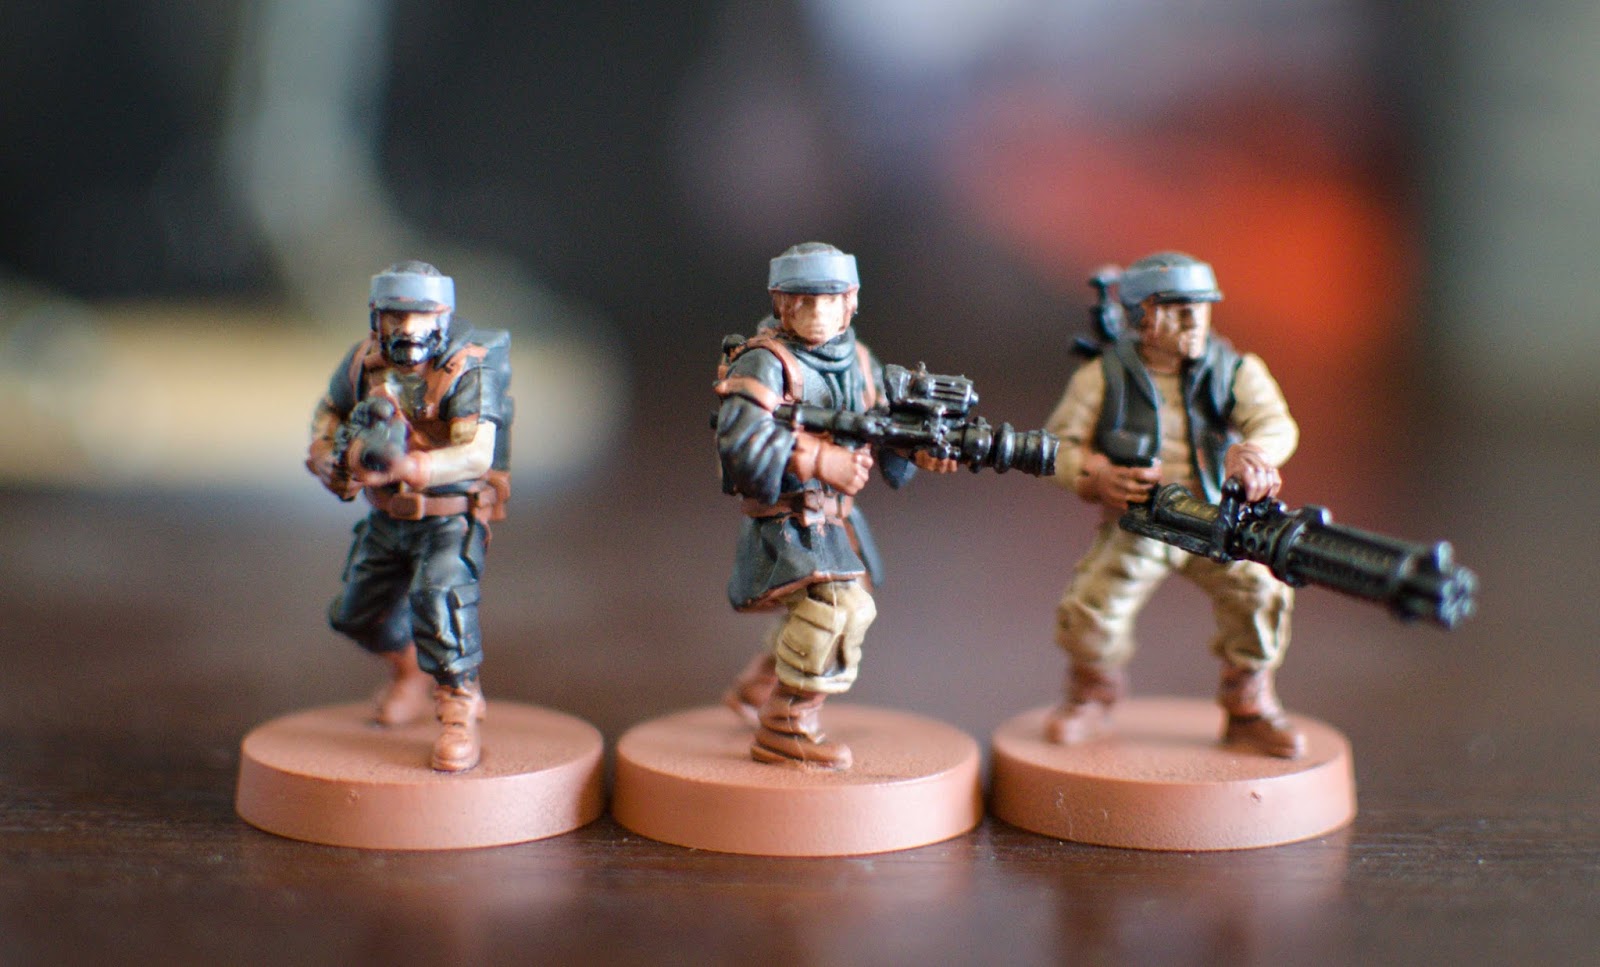
Above is a photo of some finished Rebel troopers from the core set. If you'd like a tutorial on these guys as well, please leave a comment below and let me know! Have you gotten Star Wars: Legion yet? I can't wait to start playing it! I'll be back soon with a review of the actual gameplay.
Comments
Post a Comment